

What is CSV?
CSV stands for Comma Separated Values. It is a file format used to store and exchange data in a structured manner. CSV files are commonly used for importing and exporting large amounts of data, including inventory, in various applications.
Why use CSV for inventory management in Shopify?
Shopify, one of the leading e-commerce platforms, allows you to efficiently manage your inventory using CSV files. Exporting and importing inventory with CSV files can save you time and effort, especially when dealing with a large number of products.
Exporting inventory with CSV files
To export your inventory from Shopify using CSV files, follow these steps:
- Log in to your Shopify admin panel.
- Go to the "Products" section and click on the "Export" button.

3. From the Export section, select one of the following variants:
Current page: This option will export all variants on your current page.
All variants: This option will export all of your variants.
Selected variants: This option will export the variants you have selected on the page if you have any selected.

4. From the Export as section, select one of the following CSV types:
- CSV for Excel, Numbers, or other spreadsheet programs
- Plain CSV file
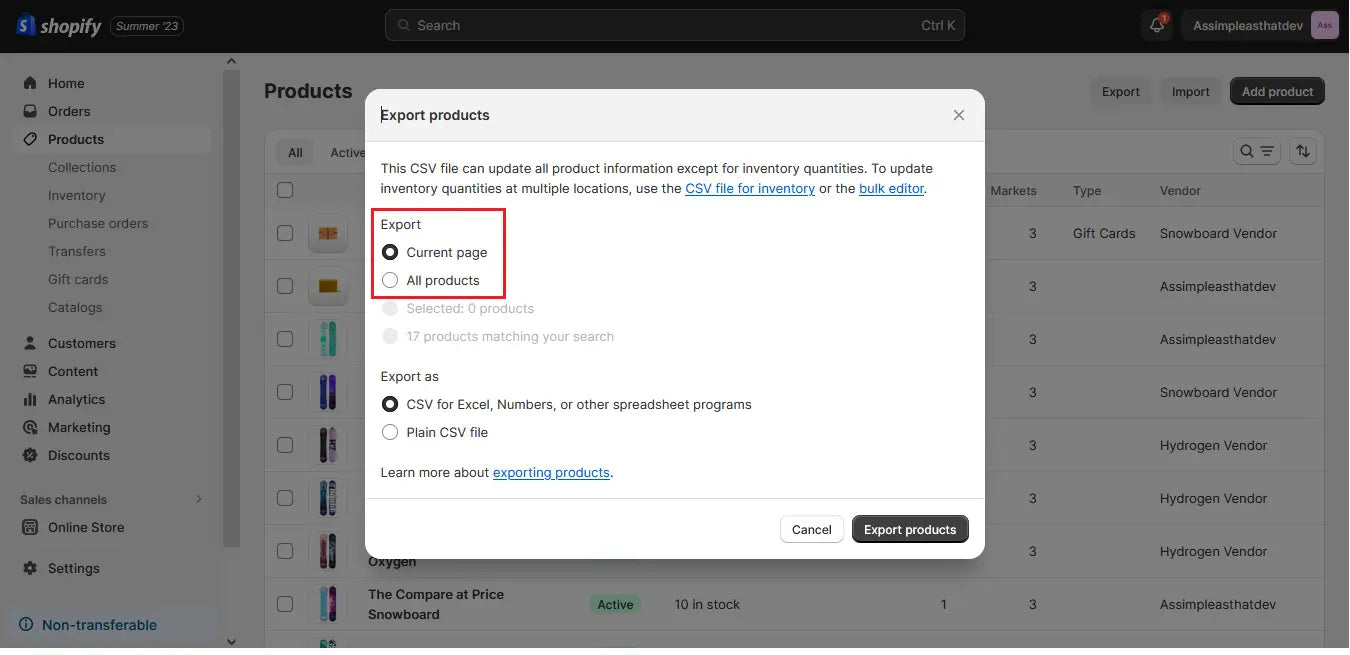
5. Click on the "Export products" button.

6. Save the exported CSV file to your computer.
Importing inventory with CSV files
To import inventory into Shopify using CSV files, follow these steps:
- Log in to your Shopify admin panel.
- Go to the "Products" section and click on the "Import" button.

- Click "Add file" and choose the CSV file you want to import.

- Verify what you intend to import, and then click Start import.

Overwrite any current products that have the same handle. Existing values will be used for any missing columns:
- If a product in your CSV file matches an existing product by its "handle" (a unique identifier), Shopify will update only the columns where you provided new data.
- Columns left blank won't change existing data.
- Use this when you want to refresh existing product information.
Publish new products to all sales channels:
- Any new products in your CSV file will instantly be available for sale on all your sales channels, like your online store and social media.
- Great for introducing brand-new products and making them available everywhere immediately.
- Map the CSV file columns to the corresponding Shopify fields.
- Review the import summary and make any necessary adjustments.
- Click on the "Import products" button.

Tips for successful CSV import and export
Here are some tips to ensure a smooth CSV import and export process:
- Double-check your CSV file for any formatting errors or missing data.
- Ensure that the column headers in your CSV file match the field names in Shopify.
- Use the correct data format for each field (e.g., dates, prices, quantities).
- Backup your data before performing any CSV imports or exports.
Exporting and importing inventory with CSV files in Shopify can greatly simplify the management of your online store. By following the steps outlined in this guide, you can efficiently transfer large amounts of product data and ensure the accuracy of your inventory. Remember to double-check your CSV files and make backups to avoid any potential data loss. Happy selling!